I've been feeling lately like I'm middle-aged. It's not something I could explain it in any clear way, beyond the obvious things (like having a couple of kids, a job that I need to pay the bills, thinking about whether I'm saving enough for retirement, etc.). Besides, you can have those things and not feel middle-aged.
Then, tonight, it hit me: you're middle-aged when you read the vast majority of things because you need to read it, not because you want to read it.
Take Supercapitalism by Robert Reich. I'm not far into it (partly because I strongly suspect I'm not going to be joyful about what I learn), but if it's anywhere close to as good as The Work of Nations then it's going to be amazingly good. Now it's true that this sort of material does hold some interest for me. But not enough to represent something like 25% of the books I've read in the last year that weren't directly for my job (or reading to my kids).
So it's not the affair with the 'other woman' (haven't had one), nor the sleek sports car (don't own one) that defines middle age. It's when you spend practically all your time reading things you need to read and very little time reading things you'd like to read.
Wednesday, November 07, 2007


Thursday, July 19, 2007
I wonder what's coming from Delta
Well, Delta Machinery has had a countdown clock on their website for more than a month now:

I think they are going to announce a new line of tools at the big AWFS woodworking show in Las Vegas. I hope it's something cool and not just an excuse to introduce a lower-quality line of tools made in China.
Looks like I'll find out tomorrow.

I think they are going to announce a new line of tools at the big AWFS woodworking show in Las Vegas. I hope it's something cool and not just an excuse to introduce a lower-quality line of tools made in China.
Looks like I'll find out tomorrow.
Tuesday, May 15, 2007
Bathtub Reading Table
I recently completed my latest woodworking project. It's a bathtub reading table made of mahogany.

I designed it to be just wide enough between the outside supports to allow felt pads on the inside edges. This prevents the table and tub from being scratched, and provides a nice smooth surface for sliding the table back and forth.

I designed it to be just wide enough between the outside supports to allow felt pads on the inside edges. This prevents the table and tub from being scratched, and provides a nice smooth surface for sliding the table back and forth.
Sunday, January 21, 2007
Learning Cocoa: Which Frameworks to Learn?
I've been wondering which frameworks on Mac OS X I should learn. It's hard to know the answer to this, since different applications will need different frameworks. But it occurred to me that examining the frameworks that Apple uses in their own applications might be a good start.
Not too surprisingly, you can determine the shared libraries used by an application. So I whipped up a little shell script to go through a set of applications and print every framework used and the number of different applications that use it. The applications are:
There are more than 100 frameworks used by these applications! Wow. This little experiment reveals some unsurprising things: learn Cocoa. But it also suggests that there are at least portions of Carbon that are required reading (the Carbon framework is the second highest used). There are some odd things near the top, like iMovieSupport.framework and some things that are obviously important but I don't know what they contain (like CoreServices.framework).
If we arbitrarily remove all the frameworks used only once, we still have 71 frameworks. If we remove those used 2 times or less, we still have 61. If we remove all that are used less than 10 times, we end up with 18 frameworks:
100 - Cocoa.framework
93 - Carbon.framework
50 - QuickTime.framework
48 - CoreServices.framework
35 - Foundation.framework
33 - OpenGL.framework
33 - CoreFoundation.framework
30 - iMovieSupport.framework
27 - AppKit.framework
24 - ApplicationServices.framework
24 - AppleAppSupport.framework
21 - IOKit.framework
17 - SystemConfiguration.framework
16 - QuartzCore.framework
13 - Security.framework
13 - AddressBook.framework
11 - QTKit.framework
10 - BDControl.framework
This is much better than 100, but still too large. I guess I need to figure out what is in these libraries and go from there. Until I can do that, I have plenty to do just learning Cocoa fundamentals and the development tools.
Not too surprisingly, you can determine the shared libraries used by an application. So I whipped up a little shell script to go through a set of applications and print every framework used and the number of different applications that use it. The applications are:
- Address Book
- Automator
- Backup
- Calculator
- Chess
- DVD Player
- Dashboard
- Dictionary
- Font Book
- GarageBand
- Image Capture
- Photo Booth
- Preview
- QuickTime Player
- Safar
- System Preferences
- TextEdit
- iCal
- iChat
- iDVD
- iMovie HD
- iPhoto
- iSync
- iTunes
- iWeb
- Keynote
- Pages
There are more than 100 frameworks used by these applications! Wow. This little experiment reveals some unsurprising things: learn Cocoa. But it also suggests that there are at least portions of Carbon that are required reading (the Carbon framework is the second highest used). There are some odd things near the top, like iMovieSupport.framework and some things that are obviously important but I don't know what they contain (like CoreServices.framework).
If we arbitrarily remove all the frameworks used only once, we still have 71 frameworks. If we remove those used 2 times or less, we still have 61. If we remove all that are used less than 10 times, we end up with 18 frameworks:
100 - Cocoa.framework
93 - Carbon.framework
50 - QuickTime.framework
48 - CoreServices.framework
35 - Foundation.framework
33 - OpenGL.framework
33 - CoreFoundation.framework
30 - iMovieSupport.framework
27 - AppKit.framework
24 - ApplicationServices.framework
24 - AppleAppSupport.framework
21 - IOKit.framework
17 - SystemConfiguration.framework
16 - QuartzCore.framework
13 - Security.framework
13 - AddressBook.framework
11 - QTKit.framework
10 - BDControl.framework
This is much better than 100, but still too large. I guess I need to figure out what is in these libraries and go from there. Until I can do that, I have plenty to do just learning Cocoa fundamentals and the development tools.
Learning Cocoa: Peeling the Currency Converter Onion
Well, after quite a bit of reading and trying to puzzle out how to use Interface Builder to work on applications using Cocoa Bindings, I've concluded that I don't understand well enough. This is rather surprising to me, since I have more than twenty years of development experience with more than fifteen years of object-oriented and GUI programming experience. But whether I'm in the early stages of dementia or Apple's documentation leaves something to be desired, I clearly have to take a different approach :-). So, I've gone back to the Currency Converter tutorial to try to make a few things gel.
I know that Xcode 3.0 and a brand spanking new version of Interface Builder are due out with Leopard sometime this spring (of 2007), but I'm trying to learn as much as I can before then. After the new Xcode and Interface Builder come out, I may revisit this subject to weigh in on the dementia versus documentation debate.
I should point out that this article is not meant to be a slam of Xcode & Interface Builder. I don't have enough knowledge to know if it's my ignorance that is the issue, if Xcode & Interface Builder need improvements, or (probably most likely) some mix of the two. So, this is as much notes to myself for future reference as anything else, posted somewhere that others might find it helpful.
So, time to get started. Happily, the tutorial is pretty up-to-date:

You'd better be up to date
[Note: This is a discussion of the tutorial and in no way takes the place of the tutorial. You probably need to have worked through the tutorial or work on it in in parallel.]
We are going to create a simple currency converter, to understand how Cocoa implements the MVC (Model/View/Controller) design pattern. The application itself is trivial:

The GUI for the Currency Converter Tutorial Application
After running the Xcode application and creating a "Cocoa Application" project, we see this:
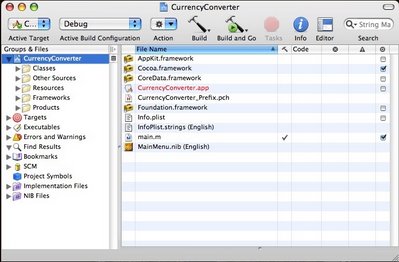
The Main Xcode Window
We are instructed to open the NIB file, named MainMenu.nib, which is the file that contains the user interface. The user interface is edited using Interface Builder, Apple's sort-of WYSIWYG GUI builder. If we double-click on MainMenu.nib, Interface Builder is launched. The tutorial walks us through a number of user interface tasks like renaming menus and menu items, titling the window, creating user interface elements, etc. All of these are simply until we get to creating some bindings.
Even the first binding action, setting up the tab order of the text items is reasonably straightforward. We control-drag from the starting field to the next field. This brings up the object inspectors Connections tab where we choose nextKeyView.

Specifying Tab Order of Text Fields
The strange part, at least to me, is how we specify the first text field to receive focus. In the object window of the NIB, we see this:
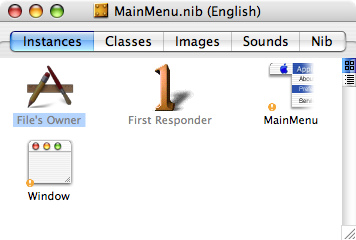
There's the item named "First Responder" staring us in the face. But we don't touch it. Instead, we control-drag from the main window to the first text field to recieve keyboard input and choose initialFirstResponder:

Setting the Main Window's "initial responder"
This is non-obvious step number one.
Next, you have to remember you need a custom controller and how to create one. I had no problem with this when I went through the tutorial because it gave me the steps. But when I went to write my own application, I forgot that you have to switch to the Classes tab of the NIB window, select the class you want to sub-class (NSObject in this case), and hit ente r. As it turns out, you can also use the contextual menu to create the sub-class:
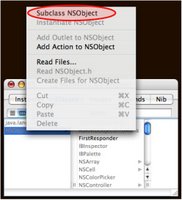
Regardless of whether you use the menu (remembering it exists) or hit enter, this is only obvious with practice, giving us non-obvious step number two.
For a complete newbie like myself, knowing what to sub-class is non-obvious, leading to non-obvious step number three. The tutorial tells us to sub-class NSObject, so we do so, naming the new class ConverterController.

Creating the ConverterController class
The tutorial now goes on to talk about outlets. When they are first brought up, their purpose and the reason for giving them a unique name is not obvious. After reading through this again, it now seems clear that outlets are really just object references. They are marked in the code with the IOOutlet macro, a null macro apparently there solely to let Interface builder find them in the code. But things get more confusing quickly. The next section telegraphs the murkiness to come. The first sentence in the "Target/Action in Interface Builder" section says:
"You can view (and complete) target/action connections in the Connections pane in the Interface Builder inspector. This pane is easy to use, but the relation of target and action in it might not be apparent."
After introducing the new term "target/action connections", in the very next sentence they define a target as the outlet of a cell that sends an action message. What the heck is a cell and what is an action message? The next few paragraphs weren't particularly helpful in explaining this.
After some additional reading and head-scratching, I think it's much simpler than they made it. UI components like buttons have their own object references ("outlets") that refer to things, and they use those references to invoke methods ("actions") on the object they refer to. It's a stinkin' object reference used to invoke a method. I honestly still have no idea what a "cell" is, but I'm betting it has to do with some abstract pattern of the UI components of the Cocoa GUI frameworks that I really don't need to know about at this point. There is one subtle bit of information buried in here: "actions" follow a naming pattern (again, to let Interface Builder find them). I wish they'd just told us that from the outset.
So now I think I finally get it: start your control-drag from the object that will do the invoking and stop on the thing to be invoked. So if your button needs to invoke the controller because it was clicked, drag from the button to the controller. If your controller needs to alter the model object, drag from the controller to the model object.
Along the way, another non-obvious thing showed up: when you view the instances tab of the NIB window, you don't see the outlets and actions of that instances class. For example, the attributes tab of the inspector is empty:
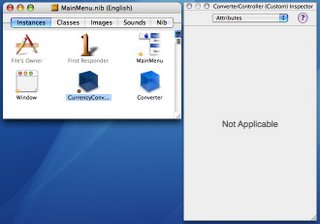
Inspector Display when Examining Instances
Then, when you switch to the Classes tab and have ConverterController selected, you see the outlets and actions:
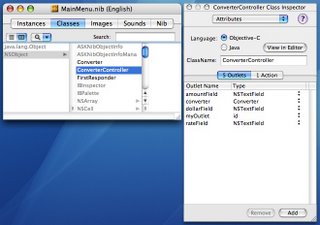
Inspector Display when Examining Classes
Don't get me wrong: this is good contextual behavior by the Inspector. But for a newbie it was a revelation when I first noticed that flipping to the Classes tab (where the ConverterController class was already selected) showed the outlets and actions I'd defined a few minutes ago and lost track of. I think a lot of this is due to trying to absorb all the new terms in the first place, leaving me dazed and confused...
The next several pages of the tutorial are reasonably straightforward, describing how to add required methods and providing the code for those methods. There's a fair bit of Objective-C, but nothing shocking to someone who understands OO.
After some housekeeping and doing a build, I was able to run my application. And of course it didn't work.
Prior to taking the time to write this down, I would have been at a loss at this point. But by forcing myself to (mostly?) sort out the whole "outlet"/"action"/"connection" business, I had enough information that I quickly figured out I'd somehow deleted the connection from my ConverterController to my Converter. Once I reconnected them, the application started working.
Getting zero feedback when I clicked and the text window for the run produce is a real issue. I understand the need to not flood a console with messages in a real application. And I realize a production GUI application may have nowhere to send messages. But Xcode has a window with text output for the session when you run the application:

The Run Log Window of Xcode
It only seems natural, especially when running the debug version, to print some error messages indicating where my problem manifested. I hope someone can tell me a simple way to turn on what should have been on by default.
I know that Xcode 3.0 and a brand spanking new version of Interface Builder are due out with Leopard sometime this spring (of 2007), but I'm trying to learn as much as I can before then. After the new Xcode and Interface Builder come out, I may revisit this subject to weigh in on the dementia versus documentation debate.
I should point out that this article is not meant to be a slam of Xcode & Interface Builder. I don't have enough knowledge to know if it's my ignorance that is the issue, if Xcode & Interface Builder need improvements, or (probably most likely) some mix of the two. So, this is as much notes to myself for future reference as anything else, posted somewhere that others might find it helpful.
So, time to get started. Happily, the tutorial is pretty up-to-date:

[Note: This is a discussion of the tutorial and in no way takes the place of the tutorial. You probably need to have worked through the tutorial or work on it in in parallel.]
We are going to create a simple currency converter, to understand how Cocoa implements the MVC (Model/View/Controller) design pattern. The application itself is trivial:
After running the Xcode application and creating a "Cocoa Application" project, we see this:
We are instructed to open the NIB file, named MainMenu.nib, which is the file that contains the user interface. The user interface is edited using Interface Builder, Apple's sort-of WYSIWYG GUI builder. If we double-click on MainMenu.nib, Interface Builder is launched. The tutorial walks us through a number of user interface tasks like renaming menus and menu items, titling the window, creating user interface elements, etc. All of these are simply until we get to creating some bindings.
Even the first binding action, setting up the tab order of the text items is reasonably straightforward. We control-drag from the starting field to the next field. This brings up the object inspectors Connections tab where we choose nextKeyView.
The strange part, at least to me, is how we specify the first text field to receive focus. In the object window of the NIB, we see this:
There's the item named "First Responder" staring us in the face. But we don't touch it. Instead, we control-drag from the main window to the first text field to recieve keyboard input and choose initialFirstResponder:
This is non-obvious step number one.
Next, you have to remember you need a custom controller and how to create one. I had no problem with this when I went through the tutorial because it gave me the steps. But when I went to write my own application, I forgot that you have to switch to the Classes tab of the NIB window, select the class you want to sub-class (NSObject in this case), and hit ente r. As it turns out, you can also use the contextual menu to create the sub-class:
Regardless of whether you use the menu (remembering it exists) or hit enter, this is only obvious with practice, giving us non-obvious step number two.
For a complete newbie like myself, knowing what to sub-class is non-obvious, leading to non-obvious step number three. The tutorial tells us to sub-class NSObject, so we do so, naming the new class ConverterController.
The tutorial now goes on to talk about outlets. When they are first brought up, their purpose and the reason for giving them a unique name is not obvious. After reading through this again, it now seems clear that outlets are really just object references. They are marked in the code with the IOOutlet macro, a null macro apparently there solely to let Interface builder find them in the code. But things get more confusing quickly. The next section telegraphs the murkiness to come. The first sentence in the "Target/Action in Interface Builder" section says:
"You can view (and complete) target/action connections in the Connections pane in the Interface Builder inspector. This pane is easy to use, but the relation of target and action in it might not be apparent."
After introducing the new term "target/action connections", in the very next sentence they define a target as the outlet of a cell that sends an action message. What the heck is a cell and what is an action message? The next few paragraphs weren't particularly helpful in explaining this.
After some additional reading and head-scratching, I think it's much simpler than they made it. UI components like buttons have their own object references ("outlets") that refer to things, and they use those references to invoke methods ("actions") on the object they refer to. It's a stinkin' object reference used to invoke a method. I honestly still have no idea what a "cell" is, but I'm betting it has to do with some abstract pattern of the UI components of the Cocoa GUI frameworks that I really don't need to know about at this point. There is one subtle bit of information buried in here: "actions" follow a naming pattern (again, to let Interface Builder find them). I wish they'd just told us that from the outset.
So now I think I finally get it: start your control-drag from the object that will do the invoking and stop on the thing to be invoked. So if your button needs to invoke the controller because it was clicked, drag from the button to the controller. If your controller needs to alter the model object, drag from the controller to the model object.
Along the way, another non-obvious thing showed up: when you view the instances tab of the NIB window, you don't see the outlets and actions of that instances class. For example, the attributes tab of the inspector is empty:
Then, when you switch to the Classes tab and have ConverterController selected, you see the outlets and actions:
Don't get me wrong: this is good contextual behavior by the Inspector. But for a newbie it was a revelation when I first noticed that flipping to the Classes tab (where the ConverterController class was already selected) showed the outlets and actions I'd defined a few minutes ago and lost track of. I think a lot of this is due to trying to absorb all the new terms in the first place, leaving me dazed and confused...
The next several pages of the tutorial are reasonably straightforward, describing how to add required methods and providing the code for those methods. There's a fair bit of Objective-C, but nothing shocking to someone who understands OO.
After some housekeeping and doing a build, I was able to run my application. And of course it didn't work.
Prior to taking the time to write this down, I would have been at a loss at this point. But by forcing myself to (mostly?) sort out the whole "outlet"/"action"/"connection" business, I had enough information that I quickly figured out I'd somehow deleted the connection from my ConverterController to my Converter. Once I reconnected them, the application started working.
Getting zero feedback when I clicked and the text window for the run produce is a real issue. I understand the need to not flood a console with messages in a real application. And I realize a production GUI application may have nowhere to send messages. But Xcode has a window with text output for the session when you run the application:

It only seems natural, especially when running the debug version, to print some error messages indicating where my problem manifested. I hope someone can tell me a simple way to turn on what should have been on by default.
Learning Cocoa: Links
I'm starting to spend more time trying to learn the Cocoa development frameworks. For those not familiar with it, Cocoa is a set of software development frameworks based around the Objective-C programming language. There are a number of different frameworks within Cocoa, including GUIs, networking (and IO in general), graphics & imaging, distributed computing, etc.
The most obvious site for learning about Cocoa is the Apple developer website. But, with the help of some friends who are also trying to learn Cocoa, I'm starting to find other good resources on the web for learning Cocoa. Since Cocoa is not as well-known as Java, C++, or Ruby, it's like discovering a whole new world on the web. Here are a few links I'm finding useful:
Cocoa Dev Central - a sort of almanac of Cocoa-related material
Cocoa Blogs - a website listing blogs of people discussing Cocoa (I still need to drill down on this one)
CocoaLab - has a PDF trying to help non-programmers learn how to program Cocoa.
CocoaHeads - "CocoaHeads is a group devoted to discussion of Apple Computer's Cocoa Framework for programming on MacOS X." A sort of clearinghouse for Cocoa Develoer Groups. There's one in St. Louis, so maybe I'll try attending.
IndieHIG - a project to create Human Interface Guidelines (HIG) that are up-to-date with the current Mac OS X look and feel. They feel Apple's guidelines are out-of-date, though the HIG guide on the apple site seems pretty up-to-date to me.
Karelia Software's Cocoa Open Source - "A random collection of useful bits of Cocoa, as found in Watson and in other sundry Karelia applications and testbeds. Feel free to adapt these for use in your Cocoa applications."
Theocacao - a website/blog by Scott Stevenson discussing Cocoa and related topics.
There are even a couple of podcasts on the subject:
Cocoa Radio
Late Night Cocoa
Some of these I found myself, while some of these came from Brian Coyner or David Giovaninni (thanks, guys!).
The most obvious site for learning about Cocoa is the Apple developer website. But, with the help of some friends who are also trying to learn Cocoa, I'm starting to find other good resources on the web for learning Cocoa. Since Cocoa is not as well-known as Java, C++, or Ruby, it's like discovering a whole new world on the web. Here are a few links I'm finding useful:
Cocoa Dev Central - a sort of almanac of Cocoa-related material
Cocoa Blogs - a website listing blogs of people discussing Cocoa (I still need to drill down on this one)
CocoaLab - has a PDF trying to help non-programmers learn how to program Cocoa.
CocoaHeads - "CocoaHeads is a group devoted to discussion of Apple Computer's Cocoa Framework for programming on MacOS X." A sort of clearinghouse for Cocoa Develoer Groups. There's one in St. Louis, so maybe I'll try attending.
IndieHIG - a project to create Human Interface Guidelines (HIG) that are up-to-date with the current Mac OS X look and feel. They feel Apple's guidelines are out-of-date, though the HIG guide on the apple site seems pretty up-to-date to me.
Karelia Software's Cocoa Open Source - "A random collection of useful bits of Cocoa, as found in Watson and in other sundry Karelia applications and testbeds. Feel free to adapt these for use in your Cocoa applications."
Theocacao - a website/blog by Scott Stevenson discussing Cocoa and related topics.
There are even a couple of podcasts on the subject:
Cocoa Radio
Late Night Cocoa
Some of these I found myself, while some of these came from Brian Coyner or David Giovaninni (thanks, guys!).
Searching: Wikipedia as a Primary Source
It's amazing to me how much good material there is on Wikipedia these days. It's getting to the point where I'm about to switch from doing a Google search as my first step in research to doing a Wikipedia search. This obviously doesn't work for very dynamic or overly specific things, like a recent news story (Google News) or some very detailed aspect of a software package. But for terms, or relatively well-known subjects, it is a wealth of information.
For example, it's entry on the Objective-C programming language is quite good. It's explanation of networking terms, for example, is surprisingly good.
It may be time to switch the default search engine for my Safari search field...
For example, it's entry on the Objective-C programming language is quite good. It's explanation of networking terms, for example, is surprisingly good.
It may be time to switch the default search engine for my Safari search field...
Wednesday, January 10, 2007
Splitting the Blog
I've decided to split my blog. I'll use this blog for more 'personal' items, not related to technology. My other blog, View From the Fringe, which has been almost unused since I created it, will be for more technical content.
So if you come here looking for something and can't find it, it may have moved over to the other blog. And if you come here looking for technical material, check out View From the Fringe.
So if you come here looking for something and can't find it, it may have moved over to the other blog. And if you come here looking for technical material, check out View From the Fringe.
Monday, January 01, 2007
Home Improvement: The Closet Project
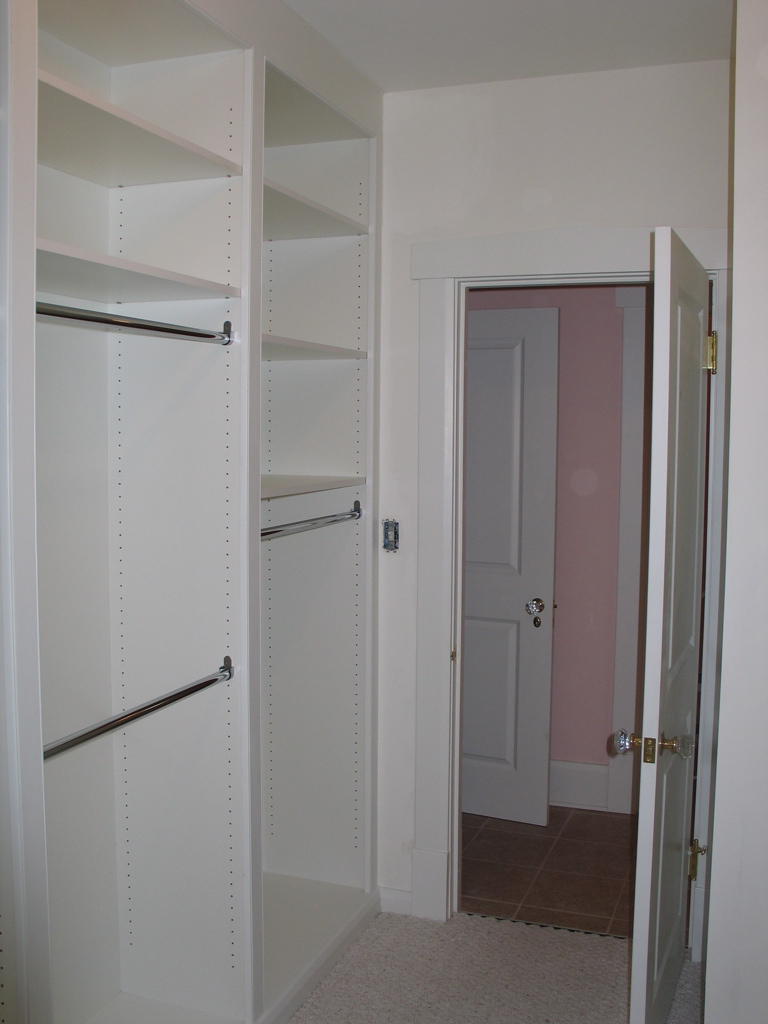
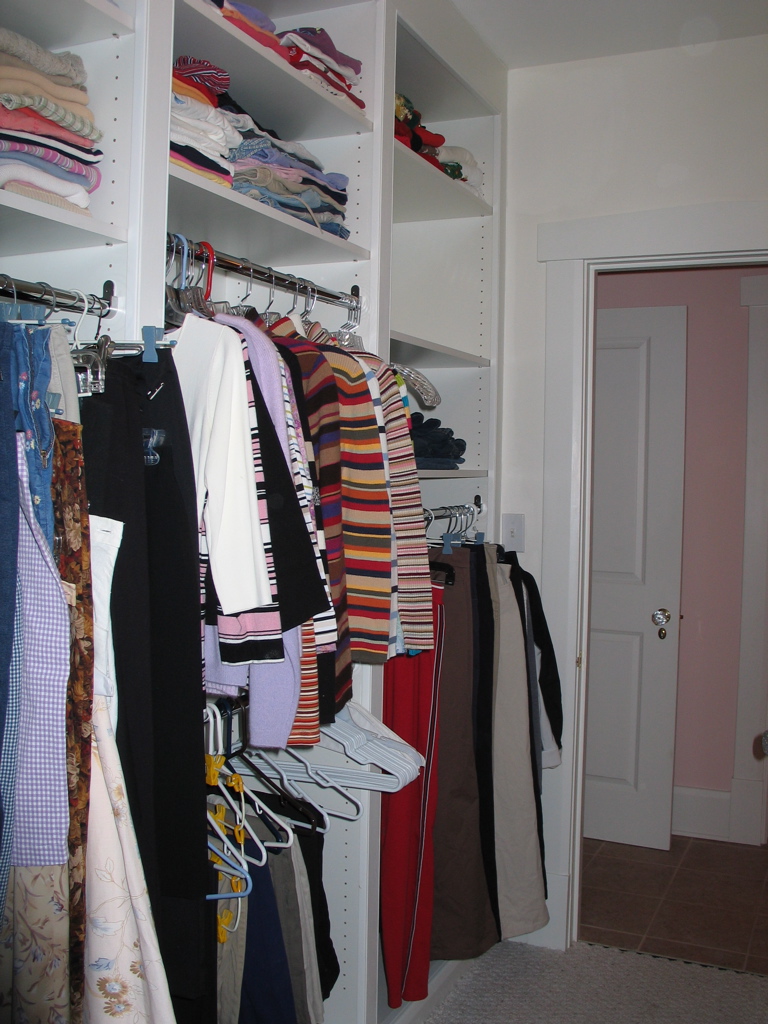
I've been working to install built-in, adjustable storage in our closet since late September. It was a fairly large project to tackle, since it would involve building the equivalent of seven bookcases, except the cases were taller (8 feet) and deeper (15 or 22 inches) than normal bookcases. In addition, I planned to build them into the space permanently.
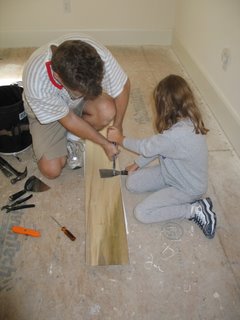
These are some pictures of the closet at the start of the projecxt, when we cleared it out:






A good friend, who is much more knowledgeable about this than I, suggested that I use a very clever system. It involves 5mm holes spaced 32mm apart. The holes can accept small pegs to hold shelves, as is common with adjustable shelf bookcases.

But the holes are also the right size to accept these very Knopf-Vogt hardware brackets:
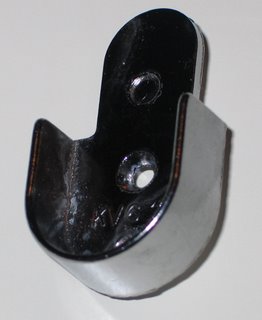
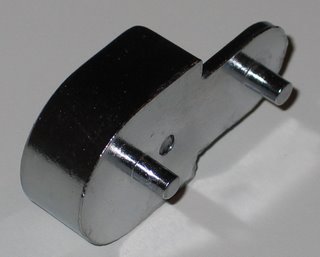
With two of these brackets, one inserted in each side of the case, it is possible to hang a clothes rod in the case at any height. This allows a "mix and match" approach, where shelves are intermixed with hanging storage at a variety of heights. My friend Dave is very smart (vastly smarter than I'll ever be) about this stuff, and this was the first of many great suggestions he made.
Here's a picture of a bracket with the rod inserted:

This was a fairly challenging project, especially since I built it with melamine (particle board which has had a kind of plastic thermally fused to both surfaces). The overall steps were:
I tried to re-stretch the carpet in the closet and failed completely. Luckily, a guy that works for the contractor who did work on our house a few years ago knows how to stretch carpet. He doesn't like to do large jobs but he agreed to do this one. He did a great job and after he was done we were ready to clean everything (which took much longer than I'd expected) and install the shelves and rod.
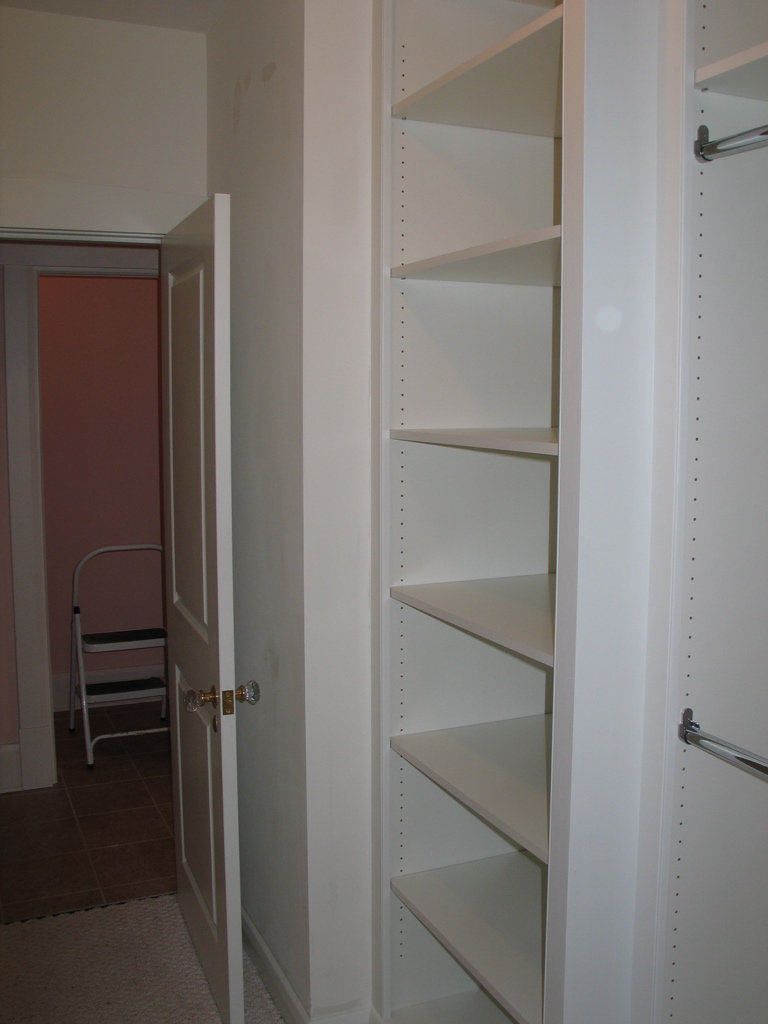
The space exceeded our expectations for flexibility. We were able to adjust shelves and rods easily, and quickly had the space customized for our clothes. The most surprising thing of all: we were able to put all our clothes into the closet, including off-season clothes that were normally stored in rubbermaids in the attic.
It was a challenging project, and I made my share of mistakes (all of which I was able to remove or repair). I learned a lot and I'm glad I did it. But most of all, I'm glad it's done.
I want to extend my eternal gratitude to my friend Dave Aholt. If not for him, this project would have been a disaster from start to finish. This project looks good because of him, and where it looks bad it's because I failed to follow his advice.

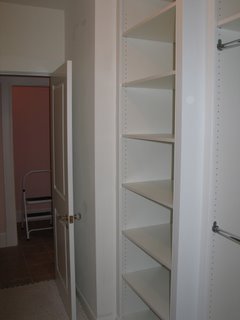

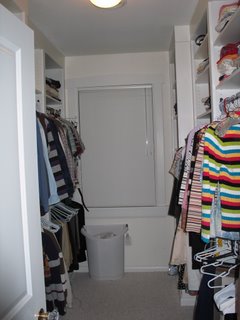
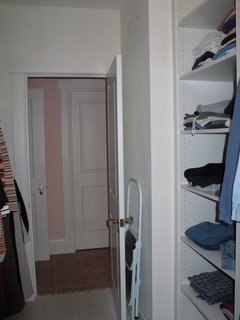
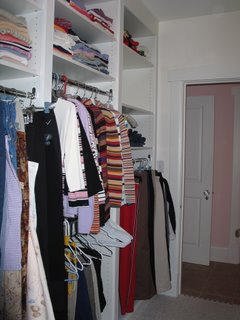
These are some pictures of the closet at the start of the projecxt, when we cleared it out:




A good friend, who is much more knowledgeable about this than I, suggested that I use a very clever system. It involves 5mm holes spaced 32mm apart. The holes can accept small pegs to hold shelves, as is common with adjustable shelf bookcases.

But the holes are also the right size to accept these very Knopf-Vogt hardware brackets:
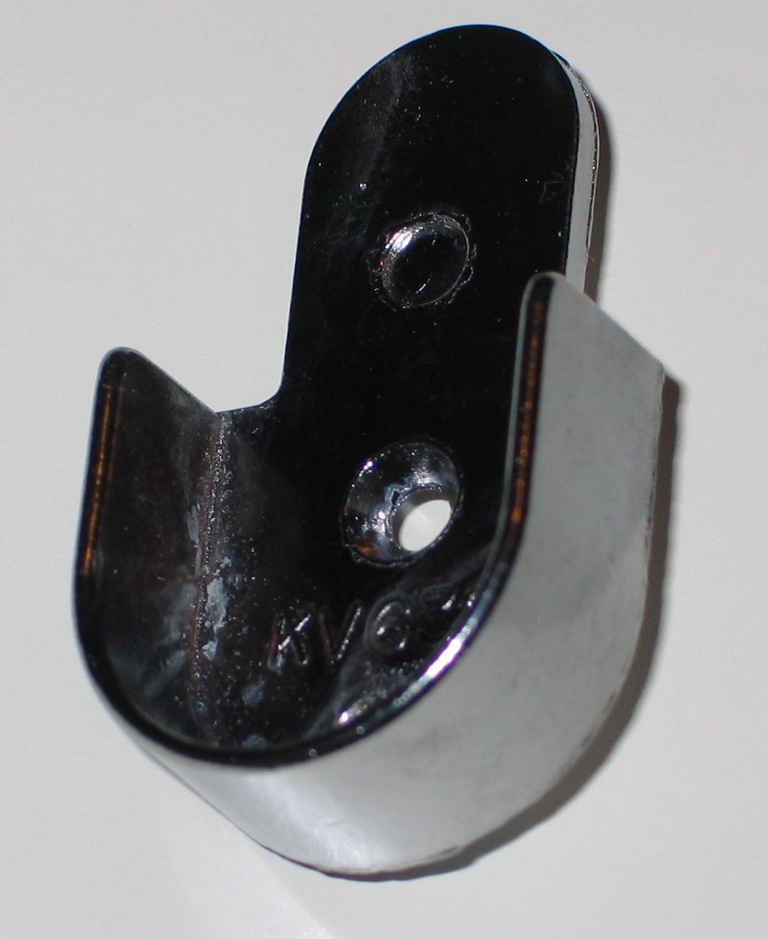

With two of these brackets, one inserted in each side of the case, it is possible to hang a clothes rod in the case at any height. This allows a "mix and match" approach, where shelves are intermixed with hanging storage at a variety of heights. My friend Dave is very smart (vastly smarter than I'll ever be) about this stuff, and this was the first of many great suggestions he made.
Here's a picture of a bracket with the rod inserted:

This was a fairly challenging project, especially since I built it with melamine (particle board which has had a kind of plastic thermally fused to both surfaces). The overall steps were:
- Clean out the room and remove the carpet and pad carefully, so some of it could be re-used later (see pictures above).
- Build a 3 inch high base for each side of the closet. Once the base was built and taken to the room, it was very carefully leveled and screwed into place. This provided a stable, level base upon which to place the carcasses. It was time consuming but there is no reliable way to get the carcasses level and even without greater risk and/or time.
- Build the pieces of the carcasses, being careful to make everything exactly the right size. This required using a special saw blade in my table saw, which has a negative hook angle. This lets it cut the melamine without creating lots of chips along the edge of the cut.
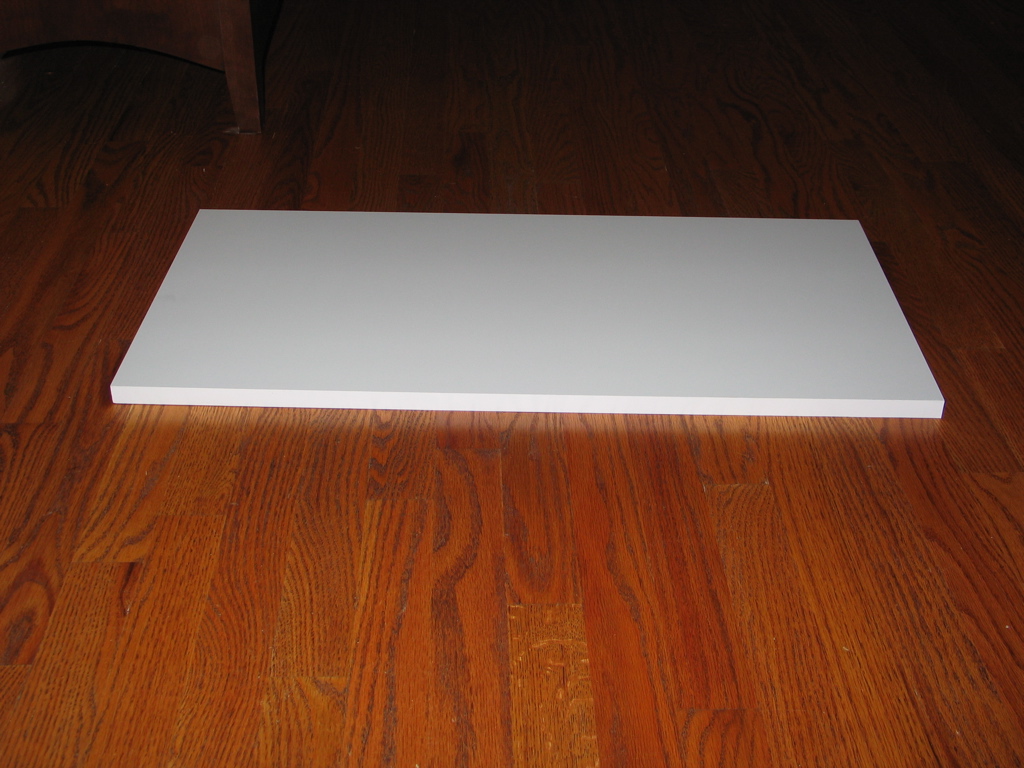
- Cut (almost) all the shelves (since I was set up to cut melamine already).
- Take the pieces of each carcass up to the closet to assemble a carcass. This was necessary because the carcasses are so big it would be impossible to fit them through the closet door if they were assembled. I also had to use a special glue, called Roo Glue Clear, that bonds well to the very slick surface of melamine. To screw the carcasses together at top and bottom, I used the Jack Rabbit drilling and screwing system. It is a very clever piece of hardware that lets you drill a hole, including the countersinking recess near the surface. After drilling the hole, you pop off the drill bit to drive the screw. I learned about this watching The New Yankee Workshop. This lets you use one drill for two purposes and not need three hands. This was my first project using it and it was worth every penny I spent on it.
- Figure out the spacing of the carcasses relative to each other and to the walls. This was important so that the finish trim pieces could all be the same width. This is a place where my friend Dave saved me. I would not have placed much importance on having the vertical trim pieces (the stiles) be the same width. I even tried having variable width pieces (I cut them to length and put them in place) and they looked terrible.
- Mill pieces of poplar the exact thickness needed to glue the carcasses together and to the walls.
- Glue strips of wood to the ceiling so they were even with the fronts of the carcasses. This provided a strip to which I could nail the wide rails that run from the edge of each carcass to the ceiling.
- Cut and attach the bottom and top rails.
- Cut and attach the baseboards. I reused the original baseboards which had been removed at the start of the project, cutting them down from 7 1/2 inches to a bit less than 3 inches.
- Cut and attach the stiles between carcasses. This step was particularly tricky, since I was gluing and nailing the stiles and needed to make sure I didn't send a nail through the side of the carcass where it would ruin it.
- Make the bead detail that runs around the sides and top of each case opening, cut them to length (mitering corners), and attach them to the inside edge of each opening.


- Prime and paint the face frames.
- Re-lay the carpet
- I was planning to attach strips of poplar to the front of each shelf, but after we had the cases done and we put a shelf into the case (without anything on the front), my wife and I decided it would look better if the shelves were simply banded with melamine across the front. So I bought a 'J' roller, a bunch of melamine edge banding, a cheap iron to activate the glue on the back of the banding, and a veneer trimmer to trim the excess after the banding had cooled.
- Cut each of the rods to the right length so they just barely fit into the brackets, making sure they won't slip out of the brackets when hangers are removed (or the rods are bumped).


I tried to re-stretch the carpet in the closet and failed completely. Luckily, a guy that works for the contractor who did work on our house a few years ago knows how to stretch carpet. He doesn't like to do large jobs but he agreed to do this one. He did a great job and after he was done we were ready to clean everything (which took much longer than I'd expected) and install the shelves and rod.
The space exceeded our expectations for flexibility. We were able to adjust shelves and rods easily, and quickly had the space customized for our clothes. The most surprising thing of all: we were able to put all our clothes into the closet, including off-season clothes that were normally stored in rubbermaids in the attic.
It was a challenging project, and I made my share of mistakes (all of which I was able to remove or repair). I learned a lot and I'm glad I did it. But most of all, I'm glad it's done.
I want to extend my eternal gratitude to my friend Dave Aholt. If not for him, this project would have been a disaster from start to finish. This project looks good because of him, and where it looks bad it's because I failed to follow his advice.



Thursday, October 05, 2006
The PC that Ate my Printer Paper
I recently set out to configure the PC my girls use for educational games to allow them to print from the PC to our printer connected to our 20" iMac. I had just slogged through getting a WiFi card to work with the Windows box, and was already pretty grouchy. But I figured printing is a solved problem, so what could go wrong? Silly me.
Being a long-time Mac user, I decided to turn there first. I turned on Windows Sharing on my Mac, hoping this would make the next steps obvious. No such luck. There was a comment from the preferences pane about referring to my Windows documentation for configuring a network printer. To me this is a 50/50 split. Part of this is due to the incredibly labyrinthian nature of Windows software, and part of this is marketing on the part of Apple to push people to the simpler solution that a Mac offers.
Then I decided to download Bonjour for Windows. This is Apple's implementation of a zeroconf-like service (Apple contributed to zeroconf but then diverged from the working group for some reason I don't yet understand).
I then downloaded the drivers for the HP C4180 printer, assuming they would be necessary to print to an HP C4180. When I tried to install the drivers, the installer complained that it couldn't find the printer, but gave me an option to install the drivers anyway. I was puzzled about why it would bark at me when it could install without the hardware but chalked it up to the oddities of Windows software. I should have been more suspicious.
Next, I tried to configure a printer with Bonjour, but couldn't find the driver for the C4180 anywhere. Turns out (after about 20 minutes of digging) that the drivers weren't actually installed when it couldn't find the printer. Of course it acted as if it installed correctly. Grrrrrr.
I resorted to hooking the C4180 up to the PC to get the drivers to install. While doing this, I thought to myself "If this screws up my printer I'm going to hurt someone at HP". It might seem odd to be concerned that the printer would be reconfigured in a manner incompatible with the Mac just by trying to install printer drivers while it was hooked up to a Windows machine. But this sort of thing has happened to me and others in the past.
After reconneting the printer to the Mac, I went back to the PC and did a Bonjour printer setup using the newly installed printer driver. Feeling hopeful, I tried to print a test page from Kid Pix, a drawing program for children that was the whole purpose behind this exercise in self-torment.
I spent the next half an hour trying different things, to no avail. Finally, I hit upon just the right Google search and learned that you have to choose the generic Postcript driver on the PC for things to work. So, all that effort to get the C4180 drivers installed was wasted. For this, I blame Apple. They should document clearly that you use the generic Postcript driver when using Bonjour to print to a printer connected to a Mac.
Thinking everything was finally solved, I try to print a test page from Kid Pix. This resulted in a paper jam in the printer. Repeated attempts ("surely the jam was a fluke") produced the same results. So, I embarked on another investigation. Printing from the Mac still works fine. Printing from NotePad on the Windows box works fine. Printing from Kid Pix still produces a paper jam every time. What the heck is going on?
Finally, after some cursing and tortuous preferences dialog comparisons, I made a guess that Kid Pix doesn't have a default paper type. Once I selected a default paper type, things started working. How anyone other than a software developer could get this far and not throw the machine across the room is beyond me.
It clearly isn't Bonjour for Windows, since NotePad printed just fine. What sort of OS would allow you to print without specifying a required parameter? Or if it's the HP printer or driver's problem, what sort of printer manufacturer would not have a default for the value?
I have a new quest: convince my wife we should spend the money to replace the kids Windows machine with a Mac.
Being a long-time Mac user, I decided to turn there first. I turned on Windows Sharing on my Mac, hoping this would make the next steps obvious. No such luck. There was a comment from the preferences pane about referring to my Windows documentation for configuring a network printer. To me this is a 50/50 split. Part of this is due to the incredibly labyrinthian nature of Windows software, and part of this is marketing on the part of Apple to push people to the simpler solution that a Mac offers.
Then I decided to download Bonjour for Windows. This is Apple's implementation of a zeroconf-like service (Apple contributed to zeroconf but then diverged from the working group for some reason I don't yet understand).
I then downloaded the drivers for the HP C4180 printer, assuming they would be necessary to print to an HP C4180. When I tried to install the drivers, the installer complained that it couldn't find the printer, but gave me an option to install the drivers anyway. I was puzzled about why it would bark at me when it could install without the hardware but chalked it up to the oddities of Windows software. I should have been more suspicious.
Next, I tried to configure a printer with Bonjour, but couldn't find the driver for the C4180 anywhere. Turns out (after about 20 minutes of digging) that the drivers weren't actually installed when it couldn't find the printer. Of course it acted as if it installed correctly. Grrrrrr.
I resorted to hooking the C4180 up to the PC to get the drivers to install. While doing this, I thought to myself "If this screws up my printer I'm going to hurt someone at HP". It might seem odd to be concerned that the printer would be reconfigured in a manner incompatible with the Mac just by trying to install printer drivers while it was hooked up to a Windows machine. But this sort of thing has happened to me and others in the past.
After reconneting the printer to the Mac, I went back to the PC and did a Bonjour printer setup using the newly installed printer driver. Feeling hopeful, I tried to print a test page from Kid Pix, a drawing program for children that was the whole purpose behind this exercise in self-torment.
I spent the next half an hour trying different things, to no avail. Finally, I hit upon just the right Google search and learned that you have to choose the generic Postcript driver on the PC for things to work. So, all that effort to get the C4180 drivers installed was wasted. For this, I blame Apple. They should document clearly that you use the generic Postcript driver when using Bonjour to print to a printer connected to a Mac.
Thinking everything was finally solved, I try to print a test page from Kid Pix. This resulted in a paper jam in the printer. Repeated attempts ("surely the jam was a fluke") produced the same results. So, I embarked on another investigation. Printing from the Mac still works fine. Printing from NotePad on the Windows box works fine. Printing from Kid Pix still produces a paper jam every time. What the heck is going on?
Finally, after some cursing and tortuous preferences dialog comparisons, I made a guess that Kid Pix doesn't have a default paper type. Once I selected a default paper type, things started working. How anyone other than a software developer could get this far and not throw the machine across the room is beyond me.
It clearly isn't Bonjour for Windows, since NotePad printed just fine. What sort of OS would allow you to print without specifying a required parameter? Or if it's the HP printer or driver's problem, what sort of printer manufacturer would not have a default for the value?
I have a new quest: convince my wife we should spend the money to replace the kids Windows machine with a Mac.
Monday, September 18, 2006
Sexy Recession
Tonight I saw no less than four ads for 'sexy' commercials for products. From 'sexy' makup to 'sexy' undergarments, it was a veritable cornucopia of underweight, over-painted, and under-dressed women (and a few leather-coated men). The topper was the advertisement from JCPenny, of all retailers, with few words, lots of innuendo, high heels, and leather coats.
The last time I saw such overt advertising was the Victoria's Secret SuperBowl-advertised online lingerie show that clogged the internet back in 1999. And while that is an interesting story on it's own, I find it a good example of my new theory of predicting recessions: overtly sexual advertising is the harbinger of recessions. As advertising agencies run out of ideas that work due to a cooling economy, they inevitably turn to sex as the path to sales. But it's a last-ditch effort in an already softening market.
Things have gotten increasingly 'sexy' on TV lately and are getting 'sexier' (and I mostly skip commercials with a TiVo, so I may be underestimating the extent). Between that and other indicators, I expect the recession to hit somewhere between April and August of next year (though I hope I'm wrong and it never happens).
Don't go crazy this holiday season...
The last time I saw such overt advertising was the Victoria's Secret SuperBowl-advertised online lingerie show that clogged the internet back in 1999. And while that is an interesting story on it's own, I find it a good example of my new theory of predicting recessions: overtly sexual advertising is the harbinger of recessions. As advertising agencies run out of ideas that work due to a cooling economy, they inevitably turn to sex as the path to sales. But it's a last-ditch effort in an already softening market.
Things have gotten increasingly 'sexy' on TV lately and are getting 'sexier' (and I mostly skip commercials with a TiVo, so I may be underestimating the extent). Between that and other indicators, I expect the recession to hit somewhere between April and August of next year (though I hope I'm wrong and it never happens).
Don't go crazy this holiday season...
Thursday, September 14, 2006
The Other Reason Apple now Offers Album Art for Free
With the latest release of iTunes, Apple added some very nice features. Several of them depend upon you having album art in order to make effective use of them. So it's not that surprising that Apple now offers album art through the iTunes music store. It is a bit surprising that they offer free album art even for albums you didn't buy through the music store. While this is mostly to enable the cool new album views in iTunes, there are at least a couple of other reasons.
We can figure out one of the reasons by noticing the wording on the Apple description of iTunes: "As long as you have an iTunes Store account, iTunes will automatically fetch available album art for any CD you imported to iTunes." So, Apple wants to make sure people keep their accounts with the store. This makes sense, as the number of competitors to iTMS increases, Apple will need to do everything it can to keep people buying from them.
A second, less tangible reason is aesthetic: album artwork seems likely to push more people toward iPods with color screens that can display the artwork well. I'm betting Apple hopes this will drive buyers toward the upper end of the product line.
Regardless, I'm enjoying looking at the artwork.
We can figure out one of the reasons by noticing the wording on the Apple description of iTunes: "As long as you have an iTunes Store account, iTunes will automatically fetch available album art for any CD you imported to iTunes." So, Apple wants to make sure people keep their accounts with the store. This makes sense, as the number of competitors to iTMS increases, Apple will need to do everything it can to keep people buying from them.
A second, less tangible reason is aesthetic: album artwork seems likely to push more people toward iPods with color screens that can display the artwork well. I'm betting Apple hopes this will drive buyers toward the upper end of the product line.
Regardless, I'm enjoying looking at the artwork.
Tuesday, September 12, 2006
WiFi on Wintel - only a geek could work it out and no one could love it
I recently installed a generic WiFi card in the Wintel PC I retired as a game machine and gave to my girls to play educational games on. Talk about an experience in frustration.
It's not that I was unable to figure it out. I did get it working. And I certainly forgot one thing while doing so that slowed me down for a bit. But the completely opaque manner in which the install went and the total lack of helpful information while troubleshooting the configuration was such a strong reminder of why I can't stand Wintel PCs that it's put me on a quest to replace the girls' machine with a Mac (running Bootcamp if necessary to play any educational PC-only games).
Things started out innocently enough. I opened up the PC and installed the WiFi card. After carefullly hooking everything back up, I turned on the PC, driver disk in hand. Things seemed alright at first, with the hardware wizard finding the new hardware (though it's announcement that it found an 'ethernet controller' presaged many similarly misleading or missing messages). I chose the innocuous radio button that said I had a driver disk (I had one, after all). That's when things started going south.
The new hardware wizard found the drivers. That's right: drivers. Five of them to be exact. They all had wonderful names with seemingly random letters and numbers, and different suffixes. I sighed and chose to move on with the default choice of the first driver. To my surprise, this seemed to work okay. Once I rebooted, the WiFi network 'connection' (which said it wasn't connected) showed up.
I've had some experience configuring wireless connections, due to helping a friend get his wireless connection working at St. Louis Bread Company a couple of years ago, because I've had a wireless network at home for a few years, and I've used WiFi from my old PowerBook G4 for years. Otherwise, I think what I managed to work out in about two hours would have taken days and a great deal of pain.
I knew everything I needed to know to connect to the wireless network, since I manage the wireless base stations that make up the network. I knew the network name (called SSID in technical parlance), I knew the password to join the network, I knew that it was a WPA2 Personal network, and I knew it was within range (the PC was no more than eight feet from two base stations).
The first symptom was that the PC failed to find the network. I knew it was there (the iMac eight feet from the PC and the laptop I could walk around with both could connect to the network fine). I also knew it wasn't a problem with some Mac-only solution, since one of the base stations is a LinkSys WRT45GL (an open-source based router). After about half an out I finally decided to make the base station publish it's network name (less secure but I suspected it might be preventing the PC from finding the network, even though I'd given it the network name).
Sure enough, publishing the network name allowed the PC to find the network. But even though the PC said it was 'connected' to the network, it then asked me if I wanted to connect to it (sigh), and when I clicked yes, it spent about a minute 'connecting' to the network it said it was connected to and then silently failed (no dialog message, no error message, nothing).
Tweny minutes of poking around the maze of dialog boxes, tab panes, and options (with many circular trips through them) finally revealed that the installation had defaulted the card to use 802.11b networking only. I have my network configured for 802.11g only because it helps performance of the network. It would seem to me that the correct default is that which allows the most chance of success (support for both B and G). It was an option, it just wasn't the default. Go figure. I changed the setting to 802.11g only and tried again.
I got almost the same results. This time, Windows claimed to have successfully connected to the network, but any attempt to use the network to communicate failed. There was no error message, and I was disconnected from the network each time I tried to use it. After about 20 minutes I remembered that I had MAC address filtering turned on (so that only the wireless network cards with ethernet addresses I specified could join the network). It took me at least five minutes to track down the network ID on the PC, but once I did I added it to the list of devices allowed to join the network. A similar thing happened when I tried to first connect my iMac to the wireless network. But in that case, I got an error message stating that my computer (the iMac) was not in the list of devices authorized to join the network. Much better than a silent failure.
So, after that change, I was finally able to join the network with the PC. But to my dismay, it didn't automatically connect to the network when I logged in under one of my daughter's accounts, even though I specified in the properties for the network that it should do so. I joined the network, and I think that it's now going to join it automatically from now on. But it's a PC, so who really knows.
It's not that I was unable to figure it out. I did get it working. And I certainly forgot one thing while doing so that slowed me down for a bit. But the completely opaque manner in which the install went and the total lack of helpful information while troubleshooting the configuration was such a strong reminder of why I can't stand Wintel PCs that it's put me on a quest to replace the girls' machine with a Mac (running Bootcamp if necessary to play any educational PC-only games).
Things started out innocently enough. I opened up the PC and installed the WiFi card. After carefullly hooking everything back up, I turned on the PC, driver disk in hand. Things seemed alright at first, with the hardware wizard finding the new hardware (though it's announcement that it found an 'ethernet controller' presaged many similarly misleading or missing messages). I chose the innocuous radio button that said I had a driver disk (I had one, after all). That's when things started going south.
The new hardware wizard found the drivers. That's right: drivers. Five of them to be exact. They all had wonderful names with seemingly random letters and numbers, and different suffixes. I sighed and chose to move on with the default choice of the first driver. To my surprise, this seemed to work okay. Once I rebooted, the WiFi network 'connection' (which said it wasn't connected) showed up.
I've had some experience configuring wireless connections, due to helping a friend get his wireless connection working at St. Louis Bread Company a couple of years ago, because I've had a wireless network at home for a few years, and I've used WiFi from my old PowerBook G4 for years. Otherwise, I think what I managed to work out in about two hours would have taken days and a great deal of pain.
I knew everything I needed to know to connect to the wireless network, since I manage the wireless base stations that make up the network. I knew the network name (called SSID in technical parlance), I knew the password to join the network, I knew that it was a WPA2 Personal network, and I knew it was within range (the PC was no more than eight feet from two base stations).
The first symptom was that the PC failed to find the network. I knew it was there (the iMac eight feet from the PC and the laptop I could walk around with both could connect to the network fine). I also knew it wasn't a problem with some Mac-only solution, since one of the base stations is a LinkSys WRT45GL (an open-source based router). After about half an out I finally decided to make the base station publish it's network name (less secure but I suspected it might be preventing the PC from finding the network, even though I'd given it the network name).
Sure enough, publishing the network name allowed the PC to find the network. But even though the PC said it was 'connected' to the network, it then asked me if I wanted to connect to it (sigh), and when I clicked yes, it spent about a minute 'connecting' to the network it said it was connected to and then silently failed (no dialog message, no error message, nothing).
Tweny minutes of poking around the maze of dialog boxes, tab panes, and options (with many circular trips through them) finally revealed that the installation had defaulted the card to use 802.11b networking only. I have my network configured for 802.11g only because it helps performance of the network. It would seem to me that the correct default is that which allows the most chance of success (support for both B and G). It was an option, it just wasn't the default. Go figure. I changed the setting to 802.11g only and tried again.
I got almost the same results. This time, Windows claimed to have successfully connected to the network, but any attempt to use the network to communicate failed. There was no error message, and I was disconnected from the network each time I tried to use it. After about 20 minutes I remembered that I had MAC address filtering turned on (so that only the wireless network cards with ethernet addresses I specified could join the network). It took me at least five minutes to track down the network ID on the PC, but once I did I added it to the list of devices allowed to join the network. A similar thing happened when I tried to first connect my iMac to the wireless network. But in that case, I got an error message stating that my computer (the iMac) was not in the list of devices authorized to join the network. Much better than a silent failure.
So, after that change, I was finally able to join the network with the PC. But to my dismay, it didn't automatically connect to the network when I logged in under one of my daughter's accounts, even though I specified in the properties for the network that it should do so. I joined the network, and I think that it's now going to join it automatically from now on. But it's a PC, so who really knows.
Monday, September 11, 2006
You won't see me mongering 9/11
I had forgotten that today is 9/11 until I checked Goggle news. This is going to be one painful news cycle. I hope it dies down before the end of the week. I hate news mongering.
17" MacBook Pro Screen Flex and Drained Batteries
More than a year ago, my friend Brad Shuler gave me a strip of paper with some little bits of some kind of plastic on them. He told me they were to keep my 15" PowerBook G4 from having its lid pop open while in a backpack or shoulder bag. When this happens, the machine can come out of sleep and end up draining it's battery completely.
The idea behind these little do-dads (called Wildeepz by their maker) is to bridge the small gap between the screen and the rest of the laptop when the laptop is closed. By creating positive pressure, as slight as it may be, they keep the lid lock engaged and prevent the lid from popping open and waking the laptop.
I had completely forgotten Brad gave them to me, and it hadn't been an issue until I recently got a Mac Book Pro of the 17" variety. Then I had my first drained battery the other day, and my conversations with Brad came rushing back. I still didn't remember he'd given me some of them, so I was debating whether to spend the $17 for the ones from Radtech or try to find some equivalent. Much to my surprise, I was organizing all my computer boxes and gear (a long-delayed task) and found the little strip of Wildeepz. Two little do-dads later and my 17" MBP is protected from unintended wakups and drained batteries.
The idea behind these little do-dads (called Wildeepz by their maker) is to bridge the small gap between the screen and the rest of the laptop when the laptop is closed. By creating positive pressure, as slight as it may be, they keep the lid lock engaged and prevent the lid from popping open and waking the laptop.
I had completely forgotten Brad gave them to me, and it hadn't been an issue until I recently got a Mac Book Pro of the 17" variety. Then I had my first drained battery the other day, and my conversations with Brad came rushing back. I still didn't remember he'd given me some of them, so I was debating whether to spend the $17 for the ones from Radtech or try to find some equivalent. Much to my surprise, I was organizing all my computer boxes and gear (a long-delayed task) and found the little strip of Wildeepz. Two little do-dads later and my 17" MBP is protected from unintended wakups and drained batteries.
Open Source Router
As part of a project to move my noisy Power Mac G4 to the basement (see my blog entery Silence is Golden), I recently bought a LinkSys WRT45GL. This is a 4-port ethernet and WiFi (802.11g) router which is hooked up to my DSL line and provides a firewall and port forwarding for the G4. I know that Kevin Heifner got this same router and immediately installed Thibor's HyperWRT version of the firmware. I don't use Vonage, and Skype has been working fine for me, so I didn't go so far as to replace the stock firmware (yet).
This router has the distinction of being built on top of a Linux kernel (interestingly, it was only after someone figured out that the firmware was based upon Linux that the firmware and technical details were released: the wikipedia for the WRT45GL).
I don't know if I'll ever replace the stock firmware with one of the open source versions, but it's nice to have the option. I doubt I'll try to do anything about it unless I run into a problem caused by the current firmware that isn't addressed by a stock updated from Cisco and is solved by some open source version with very high stability. I don't mind spending time setting these sorts of things up, but I do not want to maintain them on a regular basis.
By the way, I was amazed at the level of detail about the WRT45GL available from wikipedia. There's another blog topic for some other time.
This router has the distinction of being built on top of a Linux kernel (interestingly, it was only after someone figured out that the firmware was based upon Linux that the firmware and technical details were released: the wikipedia for the WRT45GL).
I don't know if I'll ever replace the stock firmware with one of the open source versions, but it's nice to have the option. I doubt I'll try to do anything about it unless I run into a problem caused by the current firmware that isn't addressed by a stock updated from Cisco and is solved by some open source version with very high stability. I don't mind spending time setting these sorts of things up, but I do not want to maintain them on a regular basis.
By the way, I was amazed at the level of detail about the WRT45GL available from wikipedia. There's another blog topic for some other time.
Sunday, September 10, 2006
Silence is Golden
I recently got a new 20" iMac (yes, recently enough to be saddened that they just came out with a 24" model). Since I got the new machine, I've been working to make a place in the basement where I could move the six year old Power Mac G4). The G4 is the mail server for the family domain and will eventually host a family web site.
I finally got that project completed today. It involved running ethernet cables to the attic and basement (solid masonry homes substantially decrease the range of WiFi), putting a shield along the stringers for the basement stairs (to prevent dust, crud, and dropped objects from falling onto the computer), and getting power to the location.
The actual move of the computer was anti-climactic, which is a good thing. Shut it down, disconnect the wires, move the UPS, move the computer, monitor and keyboard, and hook everything back up. A small hiccup with the outlet having a loose wire was quickly solved and everything 'just worked'. Of course, this was after about two months of on-and-off work to get networking cables run and tested, get the dirt shield created, etc. I ran into a problem with attenuation of the Ethernet signal that required me to install a 5-port ethernet switch in the basement. Just goes to show you that 'cat-5' wiring isn't always really 'cat-5' (whether it was not up to spec to begin with, or whether I crimped something and created a problem will probably never be known).
With the G4's (notorioiusly loud) cooling fans no longer generating dBs, the study where the iMac is located is now soothingly quiet. Tonight, while I was fighting with the PC the kids use to play computer games, it was noisy again (the PCs fans are even louder than the G4s). But after I shut that off, I sat in front of the iMac and enjoyed the quiet. In fact, it was so quiet I could hear the sound of a cricket outside the study window trying to foster a next generation before the end of summer.
As for the girl's PC, configuring it to use a WiFi card and to use the printer attached to the iMac was a blunt reminder of just how crappy PC hardware and software really is. But that's a story for another day.
Now, I have to figure out how to convince my wife to let me buy a 24" iMac and give the 20" iMac to the girls. Then we'd be PC-free once again.
I finally got that project completed today. It involved running ethernet cables to the attic and basement (solid masonry homes substantially decrease the range of WiFi), putting a shield along the stringers for the basement stairs (to prevent dust, crud, and dropped objects from falling onto the computer), and getting power to the location.
The actual move of the computer was anti-climactic, which is a good thing. Shut it down, disconnect the wires, move the UPS, move the computer, monitor and keyboard, and hook everything back up. A small hiccup with the outlet having a loose wire was quickly solved and everything 'just worked'. Of course, this was after about two months of on-and-off work to get networking cables run and tested, get the dirt shield created, etc. I ran into a problem with attenuation of the Ethernet signal that required me to install a 5-port ethernet switch in the basement. Just goes to show you that 'cat-5' wiring isn't always really 'cat-5' (whether it was not up to spec to begin with, or whether I crimped something and created a problem will probably never be known).
With the G4's (notorioiusly loud) cooling fans no longer generating dBs, the study where the iMac is located is now soothingly quiet. Tonight, while I was fighting with the PC the kids use to play computer games, it was noisy again (the PCs fans are even louder than the G4s). But after I shut that off, I sat in front of the iMac and enjoyed the quiet. In fact, it was so quiet I could hear the sound of a cricket outside the study window trying to foster a next generation before the end of summer.
As for the girl's PC, configuring it to use a WiFi card and to use the printer attached to the iMac was a blunt reminder of just how crappy PC hardware and software really is. But that's a story for another day.
Now, I have to figure out how to convince my wife to let me buy a 24" iMac and give the 20" iMac to the girls. Then we'd be PC-free once again.
Monday, August 14, 2006
Parallels and the Mac: Friendly Frankenstein

So I've been working with Parallels Desktop for Mac lately and it's a rather nice package. It does most of the things you'd want and does them well. Today I discovered that the full-screen mode is just a big window with no border or with the border outside the visible region of the display. As a result, you can Cmd-tab to other Mac applications and the full-screen Windows VM is still there. You can even bring up Expose and Dashboard.
It's quite the strange sight.
Friday, October 21, 2005
Pell-mell to Hell
I just checked Google News before heading to bed and was confronted with this:

It reminded me of Collapse: How Societies Choose to Succeed or Fail by Jared Diamond.
Will we destroy the biosphere to the point where it can't sustain us before we learn to appreciate the consequences of our actions?
I fear we will.
It reminded me of Collapse: How Societies Choose to Succeed or Fail by Jared Diamond.
Will we destroy the biosphere to the point where it can't sustain us before we learn to appreciate the consequences of our actions?
I fear we will.
Saturday, October 01, 2005
Macintosh: Apple and O'Reilly Safari Bookshelf team up
Well, Apple has teamed with the O'Reilly folks to offer a Safari-style subscription service for searching and reading 1000 Mac-related books online.
Brad Shuler told me about nine months ago he thought such 'online bookshelves' were the wave of the future. I mostly dismissed the idea at the time, probably because I like reading a physical book and find I absorb the material better that way. I think I was wrong. Given the high cost of printing and the speed at which the software market is changing, I think this is the wave of the future, even if I don't want it to be.
Brad Shuler told me about nine months ago he thought such 'online bookshelves' were the wave of the future. I mostly dismissed the idea at the time, probably because I like reading a physical book and find I absorb the material better that way. I think I was wrong. Given the high cost of printing and the speed at which the software market is changing, I think this is the wave of the future, even if I don't want it to be.
Subscribe to:
Posts (Atom)
